Experience has the ability to make us wiser with our actions and choices. As a photographer, I have made mistakes in the past because of which I missed out on awesome photo opportunities. If only I was more careful, I could have avoided such situations. While some of these chances are inevitable – those where you wish you should have brought your tripod, or when your lens should have had a longer reach, some can simply be avoided by having some quick checks. Making sure of certain settings before and after a shoot as part of your workflow can go a long way.
Here are five checks you should develop a habit of before you start taking photos. The post also explains what happens if you fail to do so.

Photo by Cubmundo
1. Check the Shooting Mode
If you use different shooting modes from time to time, it is best to make sure you’re using the right one before you start some serious shooting. I normally switch between Aperture Priority and Manual Modedepending on what I intend to shoot. I don’t have a problem when I intend to use Manual, since I already know I will be using 2 dials to change aperture and shutter speed. The problem is when I think I’m in Aperture Priority Mode but I’m really using Manual. I adjust the aperture dial, but the shutter speed doesn’t follow.
It’s quite obvious when this happens since you’ll see in your viewfinder that the number on the shutter setting doesn’t follow, although if you don’t take notice, you might end up with either an underexposed or overexposed image.
Unless your shooting mode dial has a safety lock to keep it from accidentally switching, use only one mode, and don’t let others touch your camera, make sure that it is set to your preferred mode all the time.
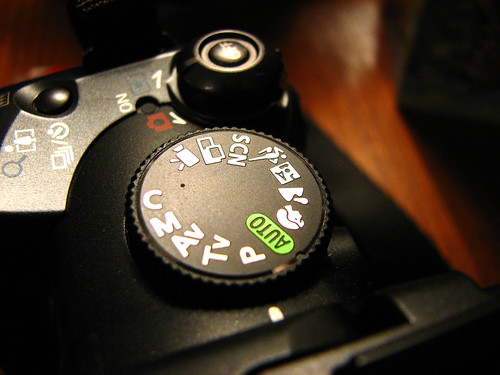
Photo by Ian Muttoo
2. Look at the ISO
I don’t know about you, but most of the time, I don’t want to think about my ISO setting too much. During the day when there is enough light, all I want to care about is whether to use wide or shallowdepth of field, or freeze and stop motion, or other techniques. I simply keep my ISO at my preferred low sensitivity setting to keep things in detail. The only time I touch it is when I find the need to do so – either when a grainy shot looks better, or if I need to push for a little more exposure.
But what if you were using a high ISO the night before since you’re looking at getting more exposure? Then suddenly you need to shoot something very interesting at high noon. If you forgot to switch back to a low ISO, chances are you’ll end up pretty frustrated that you didn’t remember that you changed it last night since your shots look pretty noisy when you would have wanted detailed ones. Always have the habit of returning to a low ISO and change as needed.
Photo by darkday.
3. Is There Any Exposure Compensation?
When your metering system is acting strange one culprit can be exposure compensation. Maybe you forgot that you were using +3 stops the last time when you were taking photos of snow so it wouldn’t look gray. Now it’s making you wonder if you forgot what you’ve learned in basic photography since your camera is causing your street shots to look overexposed.